Mix Sound Like a Pro. Part Five: EQ Tips!
Veteran Technical Director and CCI Solutions Church Relations Director Duke DeJong shares the fifth in a series of articles dedicated to helping you learn how to mix for live worship. Join Duke on Facebook at www.facebook.com/ccisolutions & www.twitter.com/ccisolutions.
 Welcome back to our Mix Like a Pro series! Today we're going to wrap up the EQ portion of our series – a topic that many church FOH folks struggle to understand. If you haven't had a chance to read our first two EQ articles, before you continue I recommend that you read Understanding EQ and Making EQ Work For You.
Now that we're on the same page on what EQ is, how it works and we have a tool to help us know what frequencies to focus on, we're going to finish our discussion on EQ with some helpful hints to help you successfully EQ your mix.
1) Before You Touch the EQ, Consider The Source
Our first tip about EQ'ing successfully actually starts before the EQ. If you have to make big EQ changes to an instrument to get it to sound good, or maybe you can't get it right at all, go listen to the instrument at its source. I can't tell you how many times I've fought an instrument's EQ only to go on stage and find out that the sound I didn't like is actually what the instrument sounds like. Instead of trying to fight the EQ, I should have been working with the musician at the source to get a better tone. As the old adage goes, garbage in equals garbage out.
2) Before You Touch the EQ, Consider Your Mic
 Poor mic choices or placement will actually hurt or help your tone more than an EQ ever can. If you find yourself having to make big EQ adjustments to a particular vocal or instrument, EQ is likely not your primary problem. Be sure to use microphones that are appropriate to your source and if you're having trouble getting the tone you want, play with mic placement or a different mic before getting carried away with EQ. For example, if the sound I get from my electric guitar amp is thin and edgy, I'm better off adjusting the mic towards the outside of the woofer (the center of the driver is where the high end comes out) than making a big boost in the low frequency of the EQ.
3) Cut Before Boosting
As we discussed in previous newsletters, boosting or cutting frequencies is actually adjusting the gain of those frequencies. Increasing gain significantly on a frequency range often will decrease clarity, increase muddiness and can even go as far as introducing extra noise if you boost too much. If you set your input gain appropriately in the first place Mix Like A Pro: Part 1 , you don't want to add more gain through EQ. Instead, work on eliminating the things you don't need or have too much of instead of adding what you think is missing. If your vocal is missing a lot of clarity, instead of putting in a big boost at 3,000 Hz, try cutting some at 315 HZ or 1,000 Hz. You'll be surprised how much better that will sound than boosting one frequency.
4) Apply The High Pass Filter
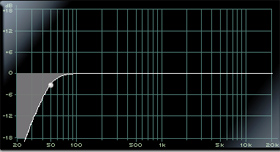
 If your vocal or instrument doesn't produce anything below 80-100 Hz, you certainly don't want whatever noise your mic is picking up down there to come through your sound system. A great way to clean up low end mud in your mix is to apply the High Pass/Low Cut filter to inputs that aren't producing any real low end.
5) Don't EQ Based on Soloing Inputs In Headphones
 Sometimes you have a lot going on and you need to solo an instrument and make adjustments based on what you hear with the input isolated. Don't let what you hear in solo through headphones be your final say. It matters less what your instrument sounds like individually than what it sounds like in the entire mix. For example, an acoustic guitar may sound big, round and full on its own, but when added to the mix with a piano, electric guitar, drums and vocals the mix sounds muddy. Taking some of the low-mid range out of the acoustic, making it sound a little thin on its own may be the very thing that helps it sit better in the mix.
6) EQ On Purpose
An easy trap to get into, is to use the same "stock or regular" EQ settings for all male singers or all electric guitars. While it's true that your "regular" vocal EQ might be a good place to start, every vocal has a unique sound and tonal signature, therefore each vocal is going to need its own variation of EQ. And when it comes to things like guitars and keyboards, not only will each guitar or keyboard have its own unique tone, but keyboard patches or electric guitar pedals will all have their own variations too. When it comes to EQ, one size does not fit all.
7) Don't Be Afraid To Make Adjustments
 Adjusting EQ should not be regarded as "set it and forget it". Each input is a living, breathing and often changing thing, and you need to be active in making adjustments. Especially in rehearsal, if something doesn't sound right, try making adjustments until it does. Even during a service, it's better to make small, gradual adjustments to get it right as opposed to leaving something sounding average. The best way to learn how to EQ is to try making adjustments and see what they sound like. Just be sure that, when in a service, you make gradual, non-distracting adjustments.
That's a wrap on the EQ portion of our Mix Like A Pro Series. If you have any questions, please don't hesitate to contact me. I also want to give a big thank you to all of you who have sent encouraging notes about our Worship Tools Newsletter and the Mix Like A Pro series. We greatly appreciate the feedback and it helps us serve you all better by knowing what is helping. And of course, if you have audio, video or lighting topics you would like to see us cover, please don't hesitate to let me know that as well.
Click to Continue Reading Part 6: The Rest of the Channel Strip!
Read the Complete 10 Part Series Here
