Mix Sound Like a Pro. Part Three: Understanding EQ
As we continue our quest of Mixing Like a Pro, we're going to tackle one of the more complicated aspects of sound – EQ. Since this is a more complex topic, let's break it into three sub-topics. We'll start with Understanding EQM (this page), then move on to How To Make EQ Work For You and finally EQ Helpful Hints.
In addition to the EQ that appears on mixing consoles, there are outboard EQ units as well as software EQ plug-ins available to us. Of course, EQ can be applied to specific input channels, to groups and AUX mixes and to the main signal that feeds your main speakers. No matter where we apply EQ, the basic principles are the same and that's what we will be looking at.
EQ Concepts
In order for us to really understand EQ, we need to start at the beginning and describe what EQ (Equalization) is, what the various types of EQs in use today are and describe the controls you are likely to find on your console. EQs are circuits that can select various groups of frequencies in an audio signal and allow us to increase or decrease the gain of these frequency groups to affect the tone characteristics of our sound. Here are a couple of vital concepts to grasp:
Frequencies
The ones we hear in sound systems are measured in Hz (Hertz) and kHz (kiloHertz). EQ frequency controls use these numbers to describe the tonal range of the audio spectrum and allow us to find specific frequencies and make adjustments to them. Low frequencies like 40 Hz and 100 Hz describe lower tones. High frequencies like 5 kHz and 10 kHs describe higher tones. You might be thinking "that's great, but how do I know which frequencies to select to make adjustments for what I am hearing from the stage?" We'll cover that in the next article.
Gain
It's important to know that when you increase or decrease EQ gain, you're increasing and decreasing the actual gain (loudness level) of those specific frequencies. Now if we've already set our gain aggressively according to what we learned in part one of our Mixing Like a Pro series, then we should know that by increasing the gain of a frequency range we could potentially cause clipping because of those boosts. More importantly, if you set your gain to have 0 dB of signal and you increase your high-mid frequencies by 6 dB, you've added 6 dB of artificial sound to the 0 dB of signal. It's for these reasons that audio pros universally recommend subtractive EQ'ing whenever possible. All that means is that we should focus on the areas where there is too much of a certain frequency range and bring that down instead of looking for frequencies that need to be boosted.
Types of EQs
There are various types of EQs of which we should be aware. Most of the gear we use today provides us with a mix of different kinds of EQs to apply to different applications. Let's look at some of these types and where we would typically use them.
Graphic EQ
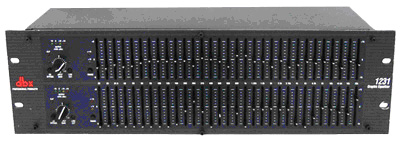
 Graphic EQ is a type of multiband EQ that consists of faders/sliders at fixed frequencies that you can use to increase or decrease gain for specific frequencies. Before the digital age, most sound systems had a graphic EQ unit. Common types are 31 band graphic EQ with 31 sliders (sometimes referred to as a 1/3 octave EQ), a 15 band EQ or some smaller versions that were built into mixers with 5 or 7 bands. The more bands, the more selective control you have over specific sets of frequencies. Each band or slider focuses on a unique frequency. With the sliders set in the center, or flat position, there is no gain being added or subtracted. Push a slider up and you increase the gain at the frequency that is selected. Push it down and reduce the gain for those frequencies.
Graphic EQs are peaking type (we'll talk more about this in a minute) so even though you have a lot of bands that you can adjust, you are really adjusting a group of frequencies, not just a single frequency with each fader knob. The sliders on a graphic EQ are laid out in order from lowest to highest frequencies, from left to right. As you look at the curve that the slider knobs create along the front panel, you see a graphical representation of how the different frequencies are affected, which is why we call them Graphic EQ's.
Graphic EQs are usually used on the main output of your system or on AUX outs to help adjust for tonal imbalances that exist in a room or to reduce hot or feedback–prone frequencies. There are a host of digital versions of Graphic EQs available as computer plug-ins or built in to most digital mixers.
Fixed Multi-Band EQ
Fixed Multi-Band EQ is a common type of EQ you will find on many basic audio mixers. Usually these come in two band and 3-band (High, Mid and Low) varieties. These EQ bands are each focused on a fixed frequency. When you make an EQ level or gain adjustment the frequencies surrounding the focus frequency are also affected. How they are affected is based on the type of EQ characteristics or curve used. Two common curve characteristics are peaking and shelving.
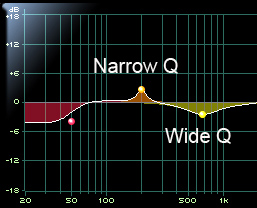
Peaking Vs. Shelving – A peaking curve is just what its name implies, that there is a maximum peak at the selected frequency when you increase the gain (or dip if you decrease the gain). The surrounding frequencies are affected less and less by the adjustment the further you get away from the center focus frequency. If you look at this on a graph you will see a bell curve of how the surrounding frequencies are affected (see the yellow curve in the image above). A shelving EQ is different in that It affects all the frequencies on one side of the center frequency the same. So instead of a bell curve on one side you see a flat line or shelf. On the other side of the curve you get the fall-off in effect described above. For example, if your low frequency EQ is a shelf set at 100 Hz and you increase the gain, everything under 100 Hz will increase the same amount. The frequencies above 100 Hz will act like they do in the peaking curve and lessen in affect the further away they are from the focus frequency (See the red and blue curves above). It is common for 3-band EQs to have the High and Low controls use the shelving method and the Mid control use the peaking method.
Adjust More Parameters with Parametric EQ
 Up 'till now we have been discussing fixed frequency EQs. It really gets fun when we start talking about what you can do with more control - the control you get with parametric EQs. Making gain adjustments at fixed frequencies is helpful, but what if the frequencies you need to adjust aren't the ones included in your EQ? That's where a semi-parametric EQ comes in.
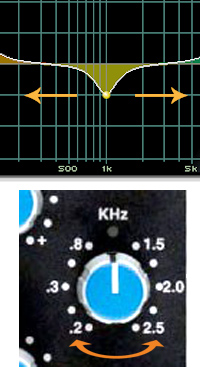
Semi-Parametric EQ – allows you to adjust the frequency center right where you need it. The frequency knob lets you select a frequency for the center of your curve (see image to the right). Many of today's common mixers use a classic set up with fixed shelving EQs for Highs and Lows and a semi-parametric EQ for MIDs. A term you might see on console spec sheets is sweepable MIDs or swept MIDs. This means there is a semi-parametric control that allows you to variably select (or sweep through) a range of frequencies in the mid band to find the one you want to adjust. There is a gain control that lets you add or subtract the level of the frequency you selected.
 Parametric EQ – gives you control over even more parameters of the EQ adjustment including the gain, the center or primary frequency of adjustment and the Q. If you have a digital console you have the ability to change your EQ between a peaking or shelving EQ. The basic idea here is that you dial in the primary frequency you want to deal with, set the Q to include more or less of the surrounding frequencies, and adjust the gain for these frequencies to shape the sound. Most smaller analog consoles have fixed or semi-parametric EQs, but many of the medium to large analog and nearly all digital consoles have parametric EQ's or a combination of parametric and semi-parametric. Many times it is set up so your high and low frequencies are semi-parametric and the low and high mids are parametric (see image on the left - click to see a larger version).
 What is Q
No, it's not a character in a James Bond movie. This is where you can set very specific control over how many frequencies your adjustment will effect. You can make the Q narrow or wide depending on the frequency range you want to effect. For example, if you're having a feedback issue at just 250 Hz, but 225 Hz and 275 Hz are really fine, you can increase the value of your Q, making the bell curve narrower in order to notch the problem frequency (see the difference between the filters marked narrow and wide in the image to the right).

High Pass and Low Pass Filters
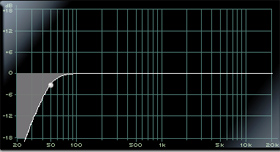
Another common EQ feature is the high pass filter (also known as the low cut filter) and the low pass filter (also know as the high cut filter). I know, the names seem really confusing. Here's a great way to remember what each filter does: The high pass filter lets the high frequencies pass through the filter unaffected. The other name for this filter is the low cut filter because it cuts out the low frequencies while letting the high frequencies pass through - get it? Use the same logic when you think about the low pass filter.
The grey curve in the picture above represents a high pass filter (low cut filter). Essentially, with a high pass filter engaged, you are going to cut (or drastically reduce) the low frequencies below your selected frequency. If your high pass is set at 100 Hz, every frequency under 100 Hz gets attenuated (reduced in gain) with more drastic reduction in the frequencies further below the set frequency. Instead of a gradual curve of gain reduction below the set frequency, you get a steep slope (typically at 18 dB per octave), which eventually amounts to negative infinity (or completely off).
Some higher–end consoles will give you the ability to adjust the steepness of the slope. Thr highpass filter is particularly useful to cut out unnecessary low frequencies in vocal microphones to eliminate handling noise and other low rumble.
Wrapping Up
This is a lot of technical data to digest but it's critical that you get the basic concepts of what EQs do before we can move on to how to use them for your worship team. In the next Worship Tools newsletter we'll tackle some ideas on how to correctly put your EQs to work for you!
Click to Continue Reading Part 4: Making EQ Work for You!
Read the Complete 10 Part Series Here
