Mix Sound Like a Pro. Part Four: Making EQ Work for You!
Veteran Technical Director and CCI Solutions Church Relations Director, Duke DeJong shares the forth in a series of articles dedicated to helping you learn how to mix for live worship Join Duke on Facebook at www.facebook.com/ccisolutions & www.twitter.com/ccisolutions.
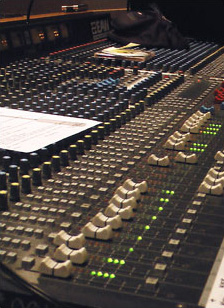 Our journey to Mixing Like A Pro continues with this week's fourth article Making EQ Work For You. In our last Worship Tools Newsletter we took a look at various EQ tools, identified their functions and what they can do for us. After all, we can't use our tools effectively if we don't know what they are or how to use them. We've covered what EQ does to shape frequencies in our sound system audio, but to know how to make EQ work for us we have to look at the actual sonic makeup of the sounds that come from the stage.
Putting EQ Into Words
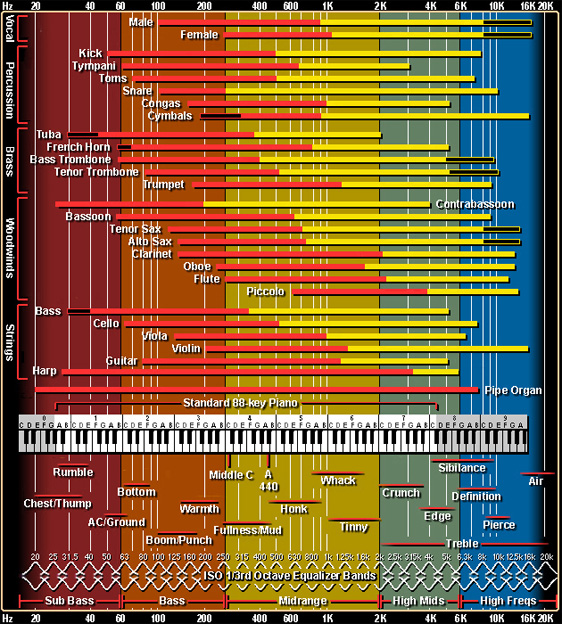
Before we focus on what we're EQ'ing, we need to learn how to interpret common language into tangible EQ adjustments. You know what I'm talking about, comments like "it's too edgy" or "it sounds muddy". What does that actually mean? Our chart image below (linked to a large version located at the bottom) gives us some hints using words like rumble, muddy and edge. With this helpful chart, we can take an educated guess that when someone says an input sounds "honky", they're referring to something in the 440-1,000 Hz range. It's not an exact science I know, but getting a good feel for what responses are elicited by certain frequencies can help us in making EQ adjustments quickly. So next time someone tells you the electric guitar sounds "edgy" or "crunchy", you can know you need to quickly look at the 2,000-4,000 Hz range to attack your problem.
Focusing in on Frequency Ranges
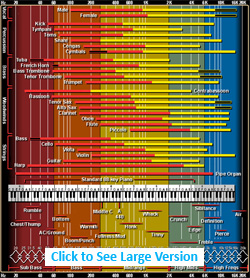 Everything we hear is made up of a range of frequencies. Each sound that hits our eardrums is made up of a collage of frequencies at a blend of sound pressure levels that our brain interprets as "the sound". Just as each person's voice has a unique makeup and signature, every instrument or vocals has a makeup of frequencies that is unique to it. In order to talk about how to EQ an input, we need to learn what frequencies are involved in the sound sources we're working with.
The chart is a great place to start to begin to understand what frequencies make up the sounds we experience on a Sunday morning. It shows us the range of any given source and it shows us the frequencies we need to focus on - and not focus on. For example, the range of a guitar will typically start around 80 Hz and will top off around 5,000 Hz. Knowing there is nothing being produced below 80 Hz, the first thing we can do is turn on the low cut/high pass filter to eliminate any low frequency junk that our guitar isn't actually producing. We also know that the guitar isn't producing frequencies over 5,000 Hz, so turning up the highs above that just adds unhelpful noise. Based on this chart we know our focus needs to be between 80 and 5000 Hz.
Critical Sound — The Voice
 Our most critical source in the church, the human voice also has clear-cut frequency ranges, regardless of whether your voices are singing or speaking. While everyone's voice has minor variations, the male voice produces frequencies between 100 and 16,000 Hz. While the female voice also shares the top end of 16,000 Hz, it doesn't typically produce any frequencies below 240 Hz. The first thing this should tell you is your low cut or high pass filter should almost always be engaged on these inputs. As you can see on our chart, the warmth or boominess of the voice is between 100-250 Hz, so most of the time there is nothing worth having below 100 Hz. The most important frequency range in the voice in my opinion, and the one I see most commonly mis-adjusted, is the intelligibility range in the high-mids (2kHz to 4kHz). When listening to vocals that are "honky" or "tinny", I often see sound guys reach for the high-mids and adjust those down to try and improve the sound. As we can see from our chart, we're actually attacking the intelligibility when lowering the high-mids, and missing the "honky/tinny" sound that's in the 400-2,000 Hz range. It seems like such a small miss on paper, but this mistake will often cost the vocals their clarity in the mix.
What To Do With Q
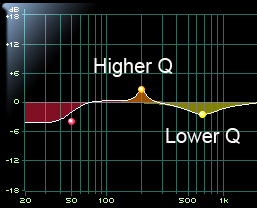 If you're fortunate enough to have a full parametric EQ with a Q knob, you have a tool that allows us to get very specific with our EQ adjustments or make general, sweeping changes. Most of the time we want to make fairly general adjustments and a single octave change is great, which is a Q value of 1. If you're needing to subtract a bit of "honkiness" from your guitar though, a 2 dB cut centered at 700 Hz with a lower Q (maybe .7) will give you a broader, wider cut to effect everything in that 400-1,000 Hz range. Or if you're fighting a particular frequency for feedback, you can make your Q very high (maybe 5 or 6) so that you are narrowly notching out the frequency that's causing you issues, leaving the rest of the frequencies alone and keeping some semblance of natural sound. The Q, if you have it, really gives you a great deal more flexibility in the adjustments you make.
Feedback
Speaking of feedback, one last thing our chart can help us with is learning what individual frequencies sound like. We all have dealt with feedback at some point. A frequency that's sensitive enough that when amplified the mic picks it up from a monitor or speaker again and again creating a feedback loop. When feedback occurs, one common way to attack it is adjusting the EQ to decrease the gain of that frequency. To be able to do that quickly and effectively, we need to know what individual frequencies sound like.
Frequency Killing
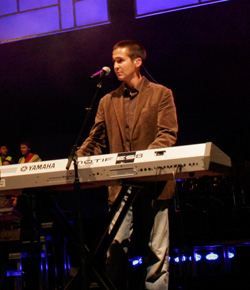 At the bottom of our chart is a standard 88-key piano that shows what frequency each note produces. When it comes to training your ears to be able to quickly respond to feedback, sitting at a piano or keyboard with this chart can help you learn exactly what frequencies sound like. Try it sometime: sit at a keyboard and focus on a typical problem range of 200-500 Hz and press one key over and over, training your brain to recognize the tone of each frequency. The middle C is a great place to start, with a frequency of 256 Hz. I find this to be a common problem for many churches. Then jump up to middle A, with a frequency of 440 Hz. Do this occasionally, spanning the entire frequency spectrum and you'll be a frequency killer in no time!
Wrap Up
Hopefully, at this point you're feeling more confident in what EQ is and what it can do for you. The difficult part of EQ is that there is no clear cut formula for what will and won't work. I can't tell you that you should always cut certain frequencies to get a great sounding input. Our vocals and instruments are living, breathing, unique things and they all have their own flavor. On top of that, every sound system and facility have their own nuances that come into play. When it comes to EQ, you have to trust what you're hearing. Use the chart. Print one out and keep it at your sound console for reference. For our next Worship Tools newsletter, we'll wrap up the EQ portion of Mixing Like A Pro with EQ Helpful Hints.
Back to small chart >>
Chart from independentrecording.net. To see an interactive version click here
Click to Continue Reading Part 5: EQ Tips!
Read the Complete 10 Part Series Here
